What is The Browser Cache?
Have you ever wondered what the browser cache actually is? Think of it as a clever little helper, either in software or hardware form, designed to store data temporarily so that you can access it more quickly later on. Specifically, the browser cache acts like a mini database where your web browser keeps various resources from the websites you visit—things like images, videos, stylesheets (CSS), and scripts (JavaScript).
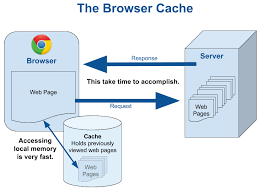
Here’s how it works: when your browser needs to fetch content from a web server, it first checks its cache. If the desired content isn’t already stored there, it goes straight to the server to retrieve it. However, if that content has been cached previously, the browser skips contacting the server altogether and pulls the information directly from its storage.

Now, there’s an essential distinction between fresh and stale content in this context. Fresh content is simply that which hasn’t yet reached its expiration date; it’s ready to be served up without any need for server interaction. On the flip side, stale content is past its prime—it may need validation to ensure that what you’re seeing is still current compared to what’s available on the server.
Sometimes, things get even trickier with invalidation—the process where cached items are removed before their expiration date. This might happen if changes have occurred on the server side; in such cases, browsers must update their caches to avoid displaying outdated information.
Web developers and administrators can take advantage of caching by using specific HTTP headers that guide browsers on when and how long they should store resources. However, navigating these headers can be quite challenging due to overlaps across different versions of HTTP protocols and complications introduced by web proxies or older browsers. Add into this mix various caching policies and plugins—especially those found in platforms like WordPress—and you’ve got yourself a potential puzzle waiting to be solved!
Understanding Browser Caching Headers
When it comes to managing what data can be temporarily stored by browsers and for how long, we refer to this framework as the caching policy. The website owner establishes this policy through specific caching response headers. While there are numerous methods to implement this, it’s advisable to start with the Cache-Control header.

Cache-Control Explained
The Cache-Control header made its debut in HTTP 1.1 and is recognised as the most contemporary method available for controlling cache behaviour. It offers a variety of options that dictate how browsers should interact with cached content, making it exceptionally adaptable. Below is a summary of the different directives associated with Cache-Control:
– No-cache: This directive advises web browsers against immediately using cached content; instead, they should verify its validity with the server first. If the content is still fresh, then it can be retrieved from the cache.
No-store instructs browsers not to store any version of the content at all. This is advantageous when handling sensitive information or frequently changing data.

– Public: This directive allows content to be cached not only by browsers but also by intermediary entities like proxies by marking it as public.
– Private: In contrast, this designation indicates that only individual browsers may cache the content while preventing intermediaries from doing so. This often pertains to user-specific information.
Max-age: The max-age directive specifies how long (in seconds) a piece of content can stay in a browser’s cache before requiring revalidation by the client. Unlike another header known as Expires, which sets a specific expiration date, max-age provides a relative timeframe starting from when the data was initially cached.
– S-maxage: Similar in function to max-age, s-maxage applies exclusively to intermediary caches.
Must-revalidate: This directive compels browsers to check back with the server for validation every time they need access to certain content instead of relying solely on their cache. This is especially useful during network disruptions.

– Proxy-revalidate: This is like must-revalidate but focused explicitly on intermediary caches; it ensures that these caches also revalidate their stored data when needed.
– No-transform: This instructs browsers regarding transformations that might alter how cached data is represented or displayed.
In summary, understanding these various caching directives equips website owners with powerful tools for optimising performance and enhancing user experience through effective management of browser caching behaviour.
The Etag response header serves as a unique identifier for specific web resources. Whenever a resource undergoes any changes, a new Etag is created. This mechanism helps conserve bandwidth since the web server can avoid sending an entire response if the Etag remains unchanged. As a result, both Nginx and Apache have Etag support turned on by default, automatically generating Etag values without requiring any additional input from users.

On another note, the Expires header was introduced with HTTP 1.0 and establishes a future date when content will be deemed outdated or stale—essentially acting as a best-before label for online content. For instance, you might see something like Expires: Thu, 25 May 2017 12:30:00 GMT.
Then there’s the Pragma header, which harks back to HTTP 1.0 and is primarily used to maintain compatibility with older systems. By including Pragma: no-cache in your requests, you can prompt your browser to function similarly to how it would with Cache-Control: no-cache directives.

How to Manage Cache on Maxthon Browser
1. Open Maxthon Browser: Launch the Maxthon browser on your device by clicking its icon.
2. Access Settings: Locate the menu icon in the upper-right corner of the browser window. Click on it, and select “Settings” from the dropdown menu.
3. Navigate to Privacy: In the Settings menu, find and click on the “Privacy” tab. This section is dedicated to managing your browsing data, including cache settings.
4. Clear Cache: To delete cached files, look for an option that says “Clear Browsing Data.” Click on it, and a new window will appear with various options for clearing data.
5. Select Cache: This window has multiple checkboxes. To clear only cache data, select the box next to “Cached images and files.”
6. Choose Time Range: You can choose how far back you want to clear the cache—options usually include the last hour, last 24 hours, or all time.
7. Confirm Action: Once you’ve made your selections, click on the “Clear Data” button at the bottom of the window. Wait a moment as Maxthon processes your request.
8. Adjust Future Cache Settings: If desired, return to the Privacy settings and explore options related to cache management, such as automatic cleanup intervals or adjusting storage limits.

9. Close Settings Menu: Finally, close the settings menu and continue browsing as usual; your cache should now be managed according to your preferences!
