Endearing yourself to the adventure of crafting your very own web browser is a thrilling experience, especially for those just entering the realm of web development. This guide makes that journey more straightforward by breaking it down into essential steps and knowledge.

Understanding Web Browsers: Begin by exploring web browsers’ purpose, evolution, and inner workings.
Prerequisites: Before diving in, it’s essential to get comfortable with foundational technologies like HTML, CSS, and JavaScript.
Choosing a Rendering Engine: Next, you’ll need to select a rendering engine. Popular choices include Blink, Gecko, or WebKit.
Setting Up Your Development Environment: Equip yourself with the right tools—install a text editor and debugging software to aid in your coding journey.
Building the Basic Structure: Once your environment is ready, start writing code for your browser. Focus on creating a simple interface that allows for navigation and effectively displays web pages.
Implementing Core Functions: Integrate critical functionalities such as loading URLs and navigation controls while utilising your chosen rendering engine.
Adding Basic Web Features: To elevate user experience further, consider incorporating features like bookmarks and tabbed browsing.
Testing Your Browser: Once you have built some features, it’s time to test your creation across various devices to ensure everything works smoothly. Address any issues that arise along the way.
Distribution and Next Steps: After thorough testing, share your browser with others! Think about potential enhancements you could implement in future versions.
This guide aims to demystify the process of building a web browser by transforming intricate concepts into manageable tasks. Start small with basic features; as you grow more confident in your skills as a developer, gradually introduce more advanced functionalities.
Now, let’s delve into what exactly web browsers do: They serve as programs enabling users to access websites on the internet. Here’s how they function:
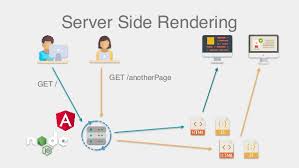
– Retrieving Files: When you enter a URL or click on a link, the browser sends out requests to servers for website files—this includes HTML documents, CSS stylesheets, JavaScript scripts, images, and other resources.
– Interpreting Code: The browser then processes this code from the website’s files to determine how everything should be displayed visually.
– Rendering Content: Finally, it assembles all components onto your screen based on its interpretation of the code. This includes arranging text and images while allowing interactivity throughout navigation.
Browsers such as Chrome, Firefox, Safari, and Edge perform these functions efficiently but strive continually for speedier performance and enhanced usability and features.
A Brief Overview of the Evolution of Web Browsers
In 1990, Tim Berners-Lee created the very first web browser, pioneering the concept of the World Wide Web. The browser that genuinely captured the public’s attention was Mosaic, released in 1993. This innovative tool introduced features like image display and bookmarks, enhancing user experience significantly. By 1995, Microsoft entered the scene with Internet Explorer, bundled with Windows operating systems. For several years, it dominated the browser market until Firefox emerged in 2004. Firefox distinguished itself with superior speed, enhanced security, and greater user functionality.
Following Firefox’s success, other browsers, such as Safari and Chrome, were launched, optimising performance for mobile devices and incorporating fresh capabilities. Today, Google Chrome reigns as the most widely used web browser; however, Firefox, Safari, and Edge remain popular contenders in this competitive landscape by continually evolving their features.

Essential Skills for Developing a Basic Web Browser
To embark on creating a simple web browser, you’ll need to familiarise yourself with several fundamental programming languages:
– HTML: This is the foundational language for building web pages. It allows you to structure content by defining elements like headings, paragraphs, and images.

JavaScript: This dynamic language adds interactivity to websites, enabling functionalities such as alert messages or form validation. It can also create interactive menus that respond to user clicks.
You may also encounter C++, which is helpful for more intricate programming tasks; however, starting with HTML, CSS, and JavaScript will suffice.
Essential Tools for Your Development Journey
Here are some essential tools you’ll require:
– Text Editor: A primary application where you can compose and refine your code. Popular options include VS Code, Sublime Text, and Atom.
– Web Browser Engine: The core component of your browser that interprets website code for display on-screen. Notable engines include Chromium (used by Chrome), Gecko (used by Firefox), and WebKit (used by Safari).
– UI Library: These libraries provide essential components for designing your browser’s interface—think windows and buttons—GTK and Qt being prominent examples.
Debugging Tools: These tools are crucial for identifying errors in your code. They are often integrated into text editors to streamline troubleshooting processes.
By mastering these languages and utilising these tools effectively, you’ll be well-equipped to start your journey into web browser development.

Preparing Your Development Environment
Before creating your web browser, you must equip your computer with the appropriate tools. Let’s walk through the process step by step.
First on the list is installing a text editor. This is where you’ll craft your code, and there are several user-friendly options to choose from:
– Visual Studio Code: A favourite among many developers, it boasts a wide array of features that enhance coding efficiency.
– Atom: Developed by GitHub, this editor offers extensive customisation options and allows for the integration of additional features.
– Sublime Text: This editor is known for its speed and simplicity. After an initial free trial, it requires a purchase.
To make your coding experience smoother, consider looking for extensions that provide functionalities like syntax highlighting and auto-completion.
Next is selecting and setting up a rendering engine. This crucial component transforms your code into the web pages users interact with. For those just starting, the Blink engine (used in Chrome) is an excellent choice. To get everything configured correctly, you’ll need to download specific files and follow detailed instructions tailored for Blink.
Lastly, don’t overlook the importance of debugging and testing tools. These resources are invaluable in identifying and resolving issues within your code. While your text editor may come equipped with some debugging capabilities, you might also want to explore:
– Valgrind: This tool specialises in detecting problems such as memory leaks.
– Selenium: A powerful resource that automates browsers for testing purposes.
Regular testing can help you catch potential issues early on in the development process, ensuring a smoother journey ahead.
Embrace Version Control

Imagine version control as a reliable save function that meticulously logs every alteration you make. If anything goes awry, it allows you to revert to a previous, functioning version. GitHub serves as a secure online repository for your code, utilising Git—a powerful system designed for monitoring changes. By following these steps, you’ll prepare your computer for the exciting journey of crafting your web browser. Keep in mind to start with the basics, test frequently, and leverage tools such as version control and debugging to guide you through the process.
Establishing the Foundation
Initiating Your Project
To embark on this web browser venture, create a new folder on your computer where all your code files can be neatly organised. Launch Visual Studio Code and select Open Folder, then choose the newly created folder. Now it’s time to establish the essential files you’ll require:
– index.html: This file will house the primary HTML code, serving as the framework for how your browser will appear.
– script.js: In this file, you’ll craft JavaScript code that will empower your browser with functionality.
To enhance your coding experience in Visual Studio Code, consider adding useful extensions like Live Server for easier testing of your work. Begin by inserting this basic HTML structure into index.html:

“`html
<!DOCTYPE html>
<html>
<head>
</head>
<body>
</body>
</html>
“`
As we progress, we’ll enrich both the head and body sections with more details.
Crafting the User Interface
Next up is designing a straightforward user interface for our browser that encompasses the following:
– A field for entering web addresses (the URL bar)
– Buttons enabling navigation—backwards and forward—as well as refreshing
– Tabs allowing multiple pages to be open simultaneously
Start by creating the URL bar within the body section by adding a text input field:
“`html
<input type=text id=url>
“`
Then, proceed to introduce buttons for navigation:
“`HTML
<button id=back>Back</button>
<button id=forward>Forward</button>
<button id=refresh>Refresh</button>
“`
Later on, we’ll implement JavaScript functionality that will bring these buttons to life within our browser experience. Finally, allocate areas where open tabs can be displayed alongside webpage content; using additional HTML elements like divs and iframes will help you structure these sections effectively. As you construct each component, remember to test out your interface regularly!
Utilising a Rendering Engine

Harnessing the power of a rendering engine is essential when creating a web browser. This component is responsible for converting website code into interactive web pages. Let’s explore the process of integrating an engine like Blink into your browser project step by step.
Selecting Your Engine
Previously, we discussed various engines such as Blink, Gecko, and WebKit. For newcomers to this field, Blink stands out as an excellent option since it powers Chrome and comes with an abundance of valuable resources. While Gecko and WebKit are also viable choices, consider factors like performance, compatibility with devices, and customisation options when making your selection.
Acquiring Necessary Files
Each rendering engine requires specific files to function effectively. If you opt for Blink, you can easily download pre-packaged files that facilitate your browser’s ability to interpret and display website code.
Configuring Build Tools
To prepare the rendering engine for integration into your project, you’ll need specific developer tools, such as Make, Ninja, or Visual Studio. Each rendering engine provides its setup instructions—be sure to adhere closely to those relevant to your chosen engine. Although setting up these tools might require some time and effort upfront, it’s crucial for progressing smoothly.
Connecting with Your Code
Next comes the task of linking the user interface and functionalities of your browser to the rendering engine. If you’re using Blink, you can leverage its C code to perform actions like loading web pages. You may need additional tools to bridge C code with JavaScript effectively.
For instance:
“`javascript
let blink = new BlinkWrapper();
function loadpage(url) {
blink.loadURL(url);
}
“`
This snippet illustrates how you could load web pages within your application.
Testing and Troubleshooting
It’s vital to thoroughly test your browser during development to identify any issues early on. Employ debugging tools and ensure testing across various websites and devices so that you can confirm optimal functionality for end-users.
By following these outlined steps, you’ll successfully integrate a rendering engine into your browser project—enabling it to display web pages seamlessly. Keep in mind that adjustments may be necessary along the way based on specific requirements or challenges encountered.
Incorporating Essential Web Features: Bookmarks
To enhance the user experience by allowing them to track their favourite web pages efficiently, consider implementing a bookmark feature. Here’s a straightforward approach to achieving this:

Saving Bookmarks
Introduce a Save Bookmark button that captures the current page’s URL, title, and relevant details. This information can be stored within the browser’s storage system or in a simple file format.
Displaying Saved Bookmarks
Create a sidebar or menu that showcases all saved bookmarks. Each entry should display the bookmark’s name, its URL, and the date it was saved. Additionally, provides users with an option to delete bookmarks if they wish.
Accessing Bookmarks
Make each bookmark clickable so that when users select one, it opens in the current window and takes them directly to the desired webpage.
Organising Bookmarks
Allow users to create folders to organise their bookmarks better and to sort them according to their preferences.
Synchronizing Bookmarks
Implement functionality that allows bookmarks to be synced across various devices. Utilise an online service so that any updates made are reflected wherever the browser is accessed.
By following these guidelines, you can establish a fundamental bookmarking system while leaving room for future enhancements.
—
Tabbed Browsing
Now let’s explore how you can facilitate opening multiple web pages simultaneously through tabbed browsing:

Creating a Tab Bar
Designate an area at the top of your browser for tabs that display titles of open web pages. Ensure that the tab currently in use is visually distinct from others for easy identification.
Opening Tabs
Configure links so they open in new tabs when clicked. Additionally, offers users the ability to open links in new tabs via a right-click context menu.
Switching Between Tabs
Allow users to switch between tabs simply by clicking on them. Change the appearance of an active tab so it is clear which one is currently being viewed.
Closing Tabs
For user convenience, include small close buttons on each tab and enable tab closing with a middle mouse button click as well.
Managing Tabs Efficiently
To help users manage their number of open tabs, users should be able to reopen previously visited pages within existing tabs rather than generating new ones every time.
With these foundational steps in place for managing multiple tabs effectively, you can later introduce more sophisticated features such as grouping tabs, offering previews of content within each tab, and syncing across devices for seamless browsing experiences.
History Search
Enable users to quickly locate previously visited websites.
Web Developer Tools

Introduce functionalities for web developers to test and troubleshoot their sites efficiently. Countless additional enhancements could further elevate your browser’s user experience!
—
As you develop your browser’s capabilities further down this path, remember that testing will be crucial to ensuring that everything functions smoothly!
In conclusion, embarking on the journey of creating your web browser offers an intriguing glimpse into the inner workings of the internet. Throughout this guide, you’ve explored the fundamental concepts behind web browsers and even learned how to construct one yourself. We’ve delved into crucial components such as HTML, CSS, and JavaScript—essential building blocks for any website. Additionally, we examined various coding tools and highlighted key features of a browser, including its user interface and the engine responsible for rendering websites on your screen.
You’ve successfully built a primary browser capable of displaying websites, navigating between pages, and bookmarking your favourite sites. It’s essential to test your creation in various scenarios to identify and resolve any issues that may arise. While developing a feature-rich browser demands more time and effort, starting with a simpler version is an excellent way to lay a solid foundation for your learning journey.

Take inspiration from established browsers like Firefox and Chrome. Observe how they tackle complex challenges such as performance optimisation, security measures, feature enhancements, and user customisation options. Collaborating with fellow developers on browser-related projects can significantly accelerate your learning process.
As you continue to expand your knowledge and confront new obstacles in web development, you’ll find that each iteration of your browser becomes increasingly sophisticated. This initial project serves as a stepping stone towards crafting browsers that deliver exceptional experiences for users everywhere.
Choose Maxthon Over Building Your Own
- Consider the Time Investment: Building your browser from scratch requires significant time and expertise in software development, user interface design, and ensuring security protocols are in place. Using Maxthon Browser saves you this valuable resource.
- Leverage Advanced Features: Maxthon comes packed with various built-in features, such as ad-blocking, cloud synchronisation, and extensive privacy options. These functionalities can enhance your browsing experience without requiring you to develop them yourself.

- Frequent Updates: The Maxthon team regularly updates the browser to fix bugs and introduce new features based on user feedback. This continuous improvement ensures that you always have access to the latest technology trends and security measures.
- Cross-Platform Compatibility: Maxthon seamlessly works with devices running Windows, macOS, Android, or iOS without requiring you to write code for each platform. This cross-compatibility lets you maintain a consistent browsing experience everywhere.
- Support Community: By choosing Maxthon, you’re joining an active community of users who share tips and solutions for common issues. This support network is invaluable compared to starting your project, where you’d be isolated.
- Customization Options: While it’s not your creation, Maxthon allows extensive customisation through settings and extensions so you can tailor your browsing experience according to your needs without starting from zero.
- Proven Reliability: With years in the market, Maxthon has demonstrated its reliability and performance under various conditions, unlike a self-built browser that may encounter unforeseen issues.
- Resource Efficiency: Developing a web browser is a resource-intensive task that requires comprehensive testing across multiple scenarios; using Maxthon gives you a polished product that’s ready out of the box without burning additional resources.
- Focus on Other Projects: Choosing an established browser enables you to redirect your efforts toward other projects or interests rather than getting bogged down in technical challenges associated with building one yourself.