Have you ever wondered what a web browser actually is? At its core, a web browser is a type of software that allows you to navigate the vast expanse of the World Wide Web. While the Internet encompasses much more than just the web, activities like checking your email or chatting with friends typically require different applications. Remember, though, that a web browser only functions when you’re connected to the Internet.
There are quite a few popular browsers out there, and most of them are available for free. For instance, if you own a Mac or an iOS device, Safari usually comes pre-installed. On Windows computers, you’ll find Internet Explorer already set up for you. But if you’re looking for alternatives, Firefox and Chrome are widely used cross-platform options that can be easily downloaded and installed on your machine.

Each browser has its unique quirks; sometimes, websites may appear or behave differently depending on which one you choose. However, they generally serve similar purposes, so selecting one often boils down to personal preference. From our experience using Blackboard on both Mac and Windows systems, Firefox tends to perform exceptionally well.
Even if you’ve been navigating the web with browsers for years now, it’s worth taking some time to appreciate the subtle distinctions between them and learn how to tweak your settings for optimal performance.
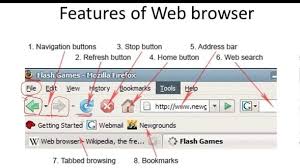
Essential Tools: Every web browser shares a familiar array of features. In the following sections, we will highlight the tool buttons available in Firefox, though you’ll likely recognize similar options in whichever browser you typically use. Most browsers provide multiple methods to execute a task; for instance, you can access the Print function through pull-down menus or by clicking a designated button or icon that serves the same purpose. Additionally, many browsers allow you to personalize your interface, enabling you to select which buttons are displayed and their arrangement on your screen. We will delve into customization later; for now, let’s focus on the tools that are universally found across all browsers.
Setting Your Default Browser: If your computer has several web browsers installed, you might notice that when launching an alternative browser, it prompts you to set it as your default option. Simply choose your preferred browser and decline any future prompts from others. However, if you change your mind later on, it’s still possible to manually adjust which browser is set as default.
The URL Bar: To navigate to a specific website, type its URL or web address into the designated bar and press Enter or Return on your keyboard. If there’s existing text in this field, feel free to edit it or remove it entirely by highlighting and hitting Delete. Just remember that entering spaces in the address will prevent it from functioning correctly.
When you navigate to a website, it’s helpful to pay attention to the address displayed in the URL bar. Typically, web addresses begin with http: or http://www, but there’s no need for you to type those parts out. For instance, if you’re aiming to reach Amazon’s site, simply enter Amazon and press Enter. The browser will automatically add the necessary prefix and the .com suffix for you. However, if you’re looking to access a site that ends in .edu, .org, or belongs to a country outside of the United States, you’ll need to include that suffix manually.
To start typing in the URL bar more easily and quickly, you can use the keyboard shortcut Control-L (or Command-L if you’re on a Mac).
Once you’ve entered an address and hit Enter or clicked on Go, there might be a brief pause as the page loads. To indicate that something is happening behind the scenes, most web browsers display an animated activity indicator—often resembling a spinning pinwheel. If this icon is in motion, it signifies that your browser is busy loading content; when it finally comes to a halt, you’ll know that your page has finished loading.
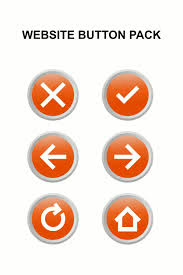
If you’ve been browsing multiple web pages consecutively and wish to revisit one of them from earlier in your session, simply click on the Back button (usually depicted by a left-facing arrow) to return. Conversely, if you’d like to move back forward after going back once too often, just click on the Forward button (represented by a right-facing arrow).
Sometimes, pages can take quite some time to load—especially with slower Internet connections. If you find yourself growing impatient and decide it’s time to abandon ship, clicking on the Stop button will instruct your browser to halt its loading attempts. In cases where only part of a page has loaded, but specific images are missing due to delays or issues, you may see placeholders where those images should be. If you’d like another chance at refreshing everything properly, hitting Reload will prompt your browser to try again for any content that didn’t appear initially; if an image still refuses cooperation after reloading, you’ll see an empty placeholder instead.
Hypertext Links: Picture this: you’re browsing a typical website, and suddenly, your eyes catch sight of some blue text that’s underlined. That’s what we refer to as a link. If you move your cursor over it, you might see a little popup that provides extra details about where that link will take you. Clicking on that text transports you to another corner of the internet. Interestingly, if you’ve clicked on that link before, it changes colour to purple, serving as a reminder of your last visit. Should you find yourself in an unexpected place after clicking, simply hit the Back button to return to where you were before. Keep in mind that some websites have their unique color schemes and may not adhere strictly to these conventions; however, they usually offer some form of visual cue indicating clickable links.

Additionally, there are times when clicking on a link won’t whisk you away from your current page but instead opens up a new window or tab. In such instances, the Back button won’t bring you back directly; instead, you’ll need to check the other window or tab for your original page. When using Blackboard, it’s advisable to select the Open Link in New Window option if you’re directing students to an external site.
Bookmarks: Now imagine discovering a webpage that captures your interest so much that you’d like to revisit it later without the hassle of memorizing its web address. That’s where bookmarking comes into play! Simply navigate to the page you adore and choose Bookmark This Page (or something similar based on your browser) from the menu options available. The next time you’re eager to explore that site again, just head back over to the Bookmark menu and pick it from your saved list with ease. While Internet Explorer refers to bookmarks as Favorites, they function identically.
Home: As soon as you launch your browser for the first time each day, it directs you automatically to a designated Home Page. Whenever you’d like to return there during your browsing session, just press the home button—it’s always at your service! You can customize this home page according to whatever website tickles your fancy, for faster loading after typing the url address.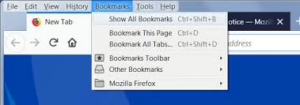 For those using Chrome, there’s even an option for multiple home pages; each one can open in its own tab right when you start up—imagine setting them all up for quick access: perhaps NAU email here, Blackboard there, and Google ready at hand!
To print a web page, simply click on the Print button. Remember that this action will print the entire web page, not just what you see on your screen. This could result in a printout that spans multiple 8.5 x 11 sheets of paper.
When it comes to security, always ensure that you’re on a secure webpage when entering sensitive information like credit card details. Look for URLs that begin with https: instead of the more common http:. Additionally, some browsers display a padlock icon to indicate that you’re browsing securely.

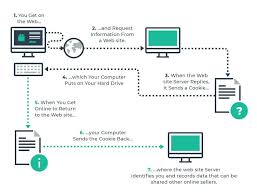
As for your browsing history, this feature allows you to keep track of all the sites you’ve visited during your session—a convenient tool for maintaining student accountability in school computer labs. You can adjust settings in your browser to determine how long this information is retained. Many browsers also offer private browsing modes where your activity won’t be recorded.
The AutoFill function can save you time by allowing you to input your personal details just once; afterwards, those pesky forms on various websites can be filled out automatically. However, it’s best to use this feature only on your personal devices. The same caution applies when saving passwords.
If you’re struggling with text readability on a webpage, there’s good news: you have the option to change the text size for better visibility. In Firefox, you can adjust this using buttons in the toolbar or through menu options like View > Zoom > Zoom In/Out, as well as keyboard shortcuts (Control and Control-). Other browsers have similar functionalities.
For everyday tasks like copying and pasting text, you’ll often find yourself selecting specific sections by dragging over them or choosing all at once before transferring them to the clipboard. Familiarizing yourself with keyboard shortcuts can make these actions quicker: Control-A selects everything; Control-X cuts selected text; Control-C copies it; and Control-V pastes from the clipboard. If you’re using a Mac, simply replace Control with Command while keeping the rest of the shortcuts unchanged.
Tabs and Windows: Keeping several web pages open simultaneously can often be more efficient than relying on the forward and back buttons. Opening new windows is advantageous when you want to compare information from different sites directly; however, this can lead to a cluttered workspace. On the other hand, using tabs is ideal for situations where you frequently switch between a few pages but prefer to keep most of them out of sight until needed.
Customizing the Browser: You have the option to personalize your browser’s appearance and adjust various advanced settings through the Tools, Options, Settings, or Preferences menu. However, locating these settings can prove somewhat tricky. They might go by different names or reside in various locations depending on the browser type—whether it’s on Mac or Windows—or even differ between versions of the same browser. Despite these challenges, finding these settings is crucial as they greatly influence how your browsing experience unfolds.
Downloads: One key aspect to configure is where downloaded files will be saved. This is essential because files don’t always open automatically or prompt you for action after downloading. Many students find themselves repeatedly downloading the same file because they click on it without any indication that a download has begun, leading them to believe nothing has occurred.
Plug-ins: Certain types of multimedia content found on websites require specific plug-ins for viewing within your browser. For instance, videos may necessitate having Quicktime installed while animations often depend on Flash plug-ins.
Helper Applications: Some downloaded files are compatible with multiple applications; however, you can designate which one should open them by default. For example, PDF files can be set to automatically launch in Adobe’s free Reader.
Privacy Settings: Your browser also allows you to tailor privacy features such as blocking or permitting pop-up windows and clearing cached data from previously visited sites.
Tips for Navigating the Internet Seamlessly with Maxthon
1. Familiarize Yourself with the Interface
Start by exploring Maxthon’s user-friendly interface. Locate key features such as the address bar, tab management options, and built-in tools like the note-taking feature. Understanding where everything is will streamline your browsing experience.
2. Utilize Cloud Sync
Enable Maxthon’s cloud sync feature. This allows you to access your bookmarks, history, and settings across multiple devices. Make sure to create an account for a seamless transition between your computer, tablet, and smartphone.
3. Customize Your Settings
Go to Options in the menu and personalize your preferences. Adjust privacy settings to enhance security while surfing the web and manage add-ons that suit your daily needs.

4. Take Advantage of Mouse Gestures
Learn mouse gestures available in Maxthon for quicker navigation. Simple movements can open new tabs or switch between pages without using keyboard shortcuts, making your browsing more efficient.
5. Explore Built-in Tools
Familiarize yourself with tools such as Web Snap and Reader Mode. Web Snap lets you take screenshots of web pages effortlessly, while Reader Mode cleans up clutter for easier reading of articles.
6. Use Ad Blocker Extensively
Activate Maxthon’s ad blocker to prevent intrusive advertisements from disrupting your browsing experience. This not only speeds up loading times but also improves overall webpage aesthetics.
7. Manage Your Tabs Effectively
Master tab management by grouping related sites together using Tab Groups for organized browsing sessions. Use “Pin” options for frequently visited sites to keep them accessible at all times.
8. Stay Updated on Security Features regularly.
Check for updates to ensure you have the latest security patches and features enabled in Maxthon. Keeping your browser current helps protect against vulnerabilities online.
9. Leverage Extensions Wisely
Browse through Maxthon’s extension store and install tools that can assist with productivity, privacy enhancement, or customization based on your needs without overwhelming the interface.
10. Participate in Community Forums
Engage with other users through Maxthon forums or support channels whenever you encounter issues or need tips on best practices specific to nuances in the browser—community insights can be invaluable!