This piece delves into the series of events that transpire between the moment a user inputs a website address into their browser and when the desired webpage finally appears.
Overview
Several vital steps unfold from the instant a user requests a web page to when it is rendered on their screen. To provide clarity, I have categorised these steps into distinct sections:
1. Navigation
2. Resolving the web address (DNS Lookup)
3. Establishing a connection with the server (TCP 3-way handshake)
4. Setting up a security protocol (TLS negotiation)
5. Sending an HTTP request
6. Receiving an HTTP response
7. Parsing data
8. Constructing the DOM tree
9. Creating the CSSOM tree
10. Merging both trees into the render tree
11. Preload Scanner
12. Compiling JavaScript
13. Building the Accessibility Tree
14. Rendering
15. Critical Rendering Path
16. Layout
17. Paint
18. Compositing
Once all these processes are complete, users can finally explore their desired page! You can use this index to navigate directly to any section that piques your interest, but if you’re unfamiliar with some of these terms, I recommend reading through them to understand them better.
Background

In this segment, we will provide a brief overview of fundamental concepts essential for grasping later discussions in this article.
Networking Models
Various models have been developed to understand how data travels across networks. One of these is so prevalent that even those outside technical fields may recognise its name: the Open Systems Interconnection (OSI) model.
The OSI Model
The OSI model outlines seven layers utilised by computer systems for communication over networks, with each successive layer representing a higher level of abstraction than its predecessor—culminating in the application layer (where browsers operate). It’s crucial to note that while this model serves as a conceptual framework for application communication over networks, it does not define specific protocols; don’t confuse it with protocols themselves, which are rigid sets of rules governing data transmission.
Consider the following scenario: a user wants to access a webpage through their browser. The journey begins with a request that travels to the application layer, where it is systematically processed down through various layers, each executing its specific tasks. Once the data reaches the physical layer of the network, it is transmitted until it arrives at the target server or another device. At this stage, the data ascends back through the layers, with each one performing its designated functions until the web server software finally utilises it. This entire sequence occurs once more when waiting for a response from the server. This illustrates how devices communicate over a network!
Now, let’s delve into a broader understanding of how browsers function. The subsequent sections of this article will explore how an average browser presents webpage content on your screen. Having a high-level grasp of browser components will be beneficial as we progress. Here are some key elements I will discuss:
– User Interface: This encompasses features like the address bar, navigation buttons (back and forward), and bookmarking options—essentially everything visible in your browser except for the area displaying your requested page.
– Browser Engine: This component coordinates interactions between the user interface and the rendering engine.
– Rendering Engine: Its primary responsibility is to present content upon request visually. For instance, if HTML content is requested, this engine parses both HTML and CSS to render what you see on your screen.
– Networking Module: This module Handles network communications like HTTP requests, employing various implementations tailored for different platforms while maintaining a platform-independent interface.
– UI Backend: This is Utilized for drawing fundamental elements such as combo boxes and windows. It provides a generic interface that isn’t tied to any specific platform but relies on operating system methods underneath.
– JavaScript Interpreter: Responsible for parsing and executing JavaScript code.
– Data Storage Layer: This layer Acts as a storage space where browsers can save various types of local data, such as cookies, and also supports mechanisms such as localStorage.
By understanding these components better, readers will be equipped to comprehend how browsers work in greater detail in later sections of this article.
It’s essential to understand that web browsers like Chrome utilise a multi-process architecture for enhanced performance and security. This design means that each tab operates as a separate process, running its instance of specific components, including the rendering engine. You can verify this by examining the processes in Chrome’s Task Manager.
In the accompanying screenshot of Chrome’s Task Manager, you’ll notice that each tab has its process priority along with CPU, network, and GPU usage statistics—indicating they function just like independent processes. And indeed, they do! If you take a moment to look at your operating system’s list of processes, you’ll undoubtedly see them included there.
As we wrap up this introductory section, it’s crucial to recognise that what we’ve discussed is merely a broad overview of how networks and browsers operate. Not all networks strictly follow the OSI or TCP/IP models; furthermore, the major browsers available today each exhibit unique characteristics while sharing foundational concepts that allow us to summarise them as we’ve done.
For instance, all browsers adhere (to varying extents) to guidelines set forth by the World Wide Web Consortium (W3C), which establishes web standards. However, the actual execution of different components can vary widely: Internet Explorer relies on Trident; Firefox uses Gecko; Safari employs WebKit; while Chrome, Edge, and Opera operate on Blink—a derivative of WebKit—and this variation extends to their JavaScript engines as well.

Now let’s consider what happens when you open a browser and type in www.google.com:
Navigation
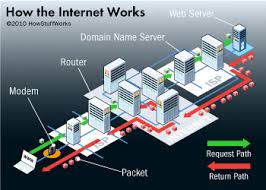
The first step involves directing your browser to the correct location. Accessing a web page means determining where its resources are stored. While we perceive web pages as simple domain names, computers translate these into IP addresses.
When you enter www.google.com into your browser, the resources for that page are hosted on a server, which might have an IP address like 93.184.216.34. If this is your first time visiting the site, a Domain Name System (DNS) lookup will be triggered to find the corresponding IP address.
Now, let’s talk about round-trip time (RTT). RTT is the time it takes, measured in milliseconds, from when your browser sends out a request until it receives a response from the server. It’s an important performance indicator for web applications. It plays a crucial role in assessing page load times and network latency, alongside another critical metric known as Time to First Byte (TTFB). I will provide annotations for each step of the network process along with their respective RTT.
To illustrate how DNS resolution works for www.google.com, here’s a simplified breakdown:
1. The browser first checks its cache and that of the operating system; if it finds the IP address there, it can skip further steps.
2. If not found locally, the browser sends out a request to a DNS resolver.
3. The DNS resolver then looks through its cache; if it has the IP address stored, it returns that information.
4. If still unresolved, the DNS resolver reaches out to root nameservers.
5. A root nameserver replies with an IP address leading to a top-level domain (TLD) nameserver—specifically for .com in this case.
6. Next, the DNS resolver queries this TLD nameserver to see if it knows where to find the required IP address.
7. The TLD nameserver responds with the IP address of an authoritative nameserver.
8. Finally, the DNS resolver makes one last request to this authoritative nameserver, asking for the specific IP associated with google.com.
9. The authoritative nameserver checks its zone files for a mapping between the domain name and IP address and informs whether it’s available.
Once all these steps are completed—though often much faster due to caching—the DNS resolver sends back the necessary server’s IP address to your browser so that you can connect.
It’s worth noting that while this process may seem lengthy when described like this, it’s typically incredibly swift in practice due to multiple caching layers explicitly designed for speed!
Creating a link to the server involves a crucial step known as the TCP Handshake, which takes one round-trip time (RTT). With the IP address now identified, the browser initiates a connection to the server through a TCP three-way handshake. This method is essential for ensuring a dependable connection. The communication is bidirectional, meaning both parties must synchronise (SYN) and acknowledge (ACK) each other’s signals. This interaction consists of four flags exchanged over three distinct steps: SYN, SYN-ACK, and ACK.
In this process, the client begins by selecting an initial sequence number included in its first SYN packet. Simultaneously, the server also picks its sequence number. Each party acknowledges receipt of the other’s sequence number by increasing it; this incremented value becomes known as the acknowledgement number. After establishing this connection, subsequent segments are typically acknowledged with ACKs.
Eventually, there will be a conclusion to this connection either through RST (resetting or terminating it) or FIN (ending it gracefully). This entire mechanism is crafted so that two communicating entities—namely, the browser and web server—can agree on the specifics of their TCP socket connection prior to any data transmission. In our scenario, this occurs over HTTPS—the secure variant of HTTP. The primary distinction between these two protocols lies in HTTPS employing TLS (SSL) to encrypt standard HTTP requests and responses. Consequently, HTTPS offers a robust layer of security compared to its predecessor, HTTP. A website utilising HTTP will have http:// in its URL, while one using HTTPS will display https://.
Next comes establishing a security protocol through TLS Negotiation, a process requiring two RTTs for secure connections made via HTTPS. This negotiation acts as another form of handshake that decides which cypher will be used to encrypt communications. It also verifies server authenticity and confirms that a secure link has been established before any actual data transfer begins.
While securing connections may introduce some delay in page loading times, investing this extra time into creating a safe environment for data exchange is undeniably worthwhile.
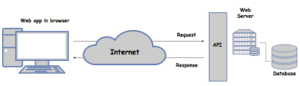
Now that we have established a TCP connection and completed the TLS handshake, it’s time for the browser to start retrieving the resources needed for the webpage. The first step in this process is to obtain the page’s markup document, accomplished through the HTTP protocol. These HTTP requests travel over TCP/IP and are encrypted with Transport Layer Security (TLS) because Google operates using HTTPS.
To access a webpage, we send an idempotent request—this means it does not alter the state of the server. Specifically, we utilise an HTTP GET request, which retrieves information from a specified server via a Uniform Resource Identifier (URI). According to proper specifications, implementations of this GET method are designed solely to fetch data without making any changes to the source’s state. Regardless of how many times you request the same resource, it will never modify anything on the server.
While there are various types of HTTP methods available, our focus here is solely on GET requests. Here’s an example of what such a request might look like:
“`
GET / HTTP/2
Host: www.google.com
User-Agent: Mozilla 5.0 (Windows NT 10.0; Win64; x64; rv:89.0) Gecko/20100101 Firefox/89.0
Accept: text/html,application/xhtml+xml,application/xml;q=0.9,image/webp;q=0.8
Accept-Language: en-GB, en;q=0.5
Accept-Encoding: gzip, deflate, br
Connection: keep-alive
Upgrade-Insecure-Requests: 1
Cache-Control: max-age=0
TE: trailers
“`
Once this request reaches the web server, it will be parsed and processed, assuming that everything is valid and all necessary files are accessible. The server then generates an HTTP response that includes relevant headers along with the content of the requested document embedded in its body.
For instance:
“`
HTTP/2 200 OK
Date: Sun, 18 Jul 2021 00:26:11 GMT
Expires: -1
Cache-Control: private,max-age=0
Content-Type: text/html; charset=UTF-8
Strict-Transport-Security:max-age=31536000
Content-Encoding: br
Server:gws
Content-Length:37418
X-XSS-Protection : 0
X-Frame-Options:SAMEORIGIN
Domain:www.google.com
Priority : high
X-Firefox-Spdy:h2
“`
The source code for that HTML document will then be included in this response structure.
Creating the DOM Tree
The journey begins with the processing of HTML markup to construct the DOM tree. This process, known as HTML parsing, involves two key activities: tokenisation and tree construction. Parsing HTML can be pretty unconventional; unlike many languages, it cannot be described using Context Grammar (CFG). Instead, HTML is defined through a formal structure known as the Document Type Definition (DTD). While I won’t delve deeply into this topic, it’s important to highlight a few reasons for its unique parsing requirements.
Firstly, HTML’s forgiving nature allows for flexibility in how it’s written. Browsers are designed with error tolerance in mind to accommodate common mistakes found in invalid HTML. Additionally, unlike other programming languages where the source remains static during parsing, HTML can include dynamic elements—like script tags that utilise the document. Write ()—which can introduce new tokens during the parsing process itself.
Due to these complexities, standard parsing methods need to be revised when dealing with HTML. As a result, browsers employ custom parsers tailored specifically for this task. The intricacies of these algorithms are thoroughly outlined in the HTML5 specification and consist mainly of two phases: tokenisation and tree construction.
Tokenisation is the initial step of linguistic analysis, where input is broken down into recognisable tokens such as start tags, end tags, attribute names, and their corresponding values. Following this stage is tree construction—the creation of a hierarchical structure based on these parsed tokens—which ultimately forms what we refer to as the DOM tree.
The DOM tree serves as an outline of the document’s content. At its foundation lies the html element—the root node from which all other nodes branch out. This tree visually represents how different tags relate to one another; tags nested within others become child nodes within this structure. It’s worth noting that an increase in DOM nodes results in longer construction times for this tree.
To illustrate this concept further, consider a visual representation of part of the DOM Tree produced by our parser. When it encounters non-blocking resources like images, for instance, it prompts the browser to request those resources accordingly.
Scripts undergo parsing to form abstract syntax trees (ASTs). As illustrated in the diagram from V8’s engine blog, specific browser engines take these ASTs and feed them into an interpreter, which generates bytecode that is executed on the main thread. This process is referred to as JavaScript compilation.
Next, the browser constructs an accessibility tree designed for assistive technologies to analyse and interpret content. This accessibility object model (AOM) serves as a semantic counterpart to the Document Object Model (DOM). Whenever the DOM changes, the accessibility tree is updated accordingly. However, assistive technologies cannot modify this tree themselves.
Before users can access content through screen readers, the AOM must be fully established.
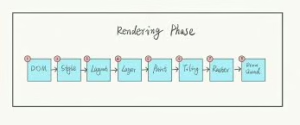
Once parsing is complete, the browser can start rendering the information. To do this effectively, it utilises a render tree to create a visual representation of the document. The rendering process involves several steps: layout, painting, and sometimes compositing.
At this juncture, it’s essential to discuss the Critical Rendering Path (CRP). Visualising it through a diagram can be quite helpful: The Critical Rendering Path highlights how optimising this path can enhance time-to-first-render metrics. Reflows and repaints must occur at a target rate of 60 frames per second for smooth user interactions. While we won’t delve deeply into optimisation strategies for CRP here, it generally revolves around speeding up page loads by prioritising resource-loading sequences and minimising file sizes.
Now, let’s explore what happens during the rendering stages—starting with layout. Layout represents the initial stage of rendering, where both geometry and positioning of nodes within the render tree are established. Once we have our render tree ready, layout processing begins—a recursive endeavour that starts from the root renderer linked to the HTML element of our document.

The Dirty Bit Mechanism
To avoid the inefficiency of recalculating the entire layout for every minor adjustment, web browsers implement a system known as the dirty bit. When a renderer undergoes a change or is newly introduced, it marks itself and its offspring as dirty, signifying that they require layout adjustments. There are two key indicators in this system:
– Dirty: This signifies that the specific node requires a layout update.
– Children are dirty: This indicates that at least one child node needs a layout refresh.
Layout Process
Thanks to the dirty bit mechanism, browsers can execute an algorithm to determine how elements should be laid out on the page. Here’s an overview of this process:
1. The parent node establishes its width.
2. It then examines its children:
– It calculates the size required for each child renderer.
– If any child has descendants marked as dirty, it triggers their layout process.
3. The parent aggregates the heights of its children along with any margins and padding to determine its height, which will influence how it interacts with its parent renderer.
4. Finally, it resets its dirty bit to false.
An essential concept linked to this process is reflow. The term layout refers to the initial determination of nodes’ sizes and positions, while subsequent adjustments are termed reflows. For instance, if an image’s size is not specified during the initial layout phase and is later determined when it’s loaded, a reflow will occur.
Painting Phase

The final step in rendering is painting. During this phase, browsers transform each box defined in the layout stage into visible pixels on the screen. Painting encompasses rendering all visual aspects of an element—text, colours, borders, shadows—as well as replaced items like buttons and images—and it must be executed rapidly.
Order of Painting
According to CSS2 specifications, there’s a defined order for painting elements, which corresponds with their arrangement within stacking contexts; elements are painted from back to front based on this stacking order:
1. Background color
2. Background image
3. Border
4. Children
5. Outline
Layers of Painting in Web Graphics
When it comes to rendering visuals on a webpage, painting can divide elements within the layout tree into distinct layers. By shifting content processing to the GPU rather than relying solely on the CPU’s main thread, we can significantly enhance both paint and repaint efficiency. Specific properties and elements are vital in creating these layers; for instance, video and canvas tags, along with any element that possesses CSS attributes such as opacity or a 3D transform, will automatically generate their layer. This layering extends not only to the element itself but also to its child elements unless one of those children requires its layer for similar reasons.
While utilizing layers does boost performance, it’s essential to be mindful of their memory demands—overusing them can complicate web performance optimisation strategies.
The Role of Compositing
When various sections of a document are rendered across different layers that overlap one another, compositing becomes essential. This process ensures that everything is displayed on screen in the correct sequence and that all content appears as intended. As assets load onto the page, reflows may occur—like when an image arrives later than expected—which triggers both a repaint and a composite. If we had specified our image’s dimensions from the get-go, we could have avoided unnecessary reflows; only the affected layer would need repainting and compositing when required. Unfortunately, since we neglected to define that size initially, once the image is retrieved from the server, rendering must revert through layout steps anew.
Finalising Rendering
Once painting on the main thread concludes, you might assume that everything is complete—but that’s not always true. If there’s JavaScript involved that was appropriately deferred until after the onload event occurs, it may occupy time on the main thread. This busy state can hinder interactions like scrolling or touch responses.
The Time to Interactive (TTI) metric measures how long it takes from initiating a request—covering DNS lookups and SSL connections—to when users can actively engage with a fully responsive page.
The Time to Interactive (TTI) metric for JavaScript measures the duration from the moment a user initiates a request—triggering DNS resolution and establishing an SSL connection—to when the webpage becomes interactive. Interactivity is defined as the period after the First Contentful Paint, during which the page can respond to user inputs within 50 milliseconds. When JavaScript occupies the main thread by parsing, compiling, and executing, it becomes unavailable for handling user interactions promptly (that is, in less than 50 milliseconds).
Consider a scenario where an image loads rapidly; however, if another script file named anotherscript.js is 2MB in size and our user’s internet connection is sluggish, they might quickly see the page but be unable to scroll smoothly until that script has fully downloaded, parsed, and executed. This situation leads to a poor user experience.
To illustrate this issue further, take a look at a WebPageTest example where JavaScript monopolises the main thread. In this case, it took over 1.5 seconds for DOM content to load while the main thread remained entirely occupied throughout that duration—rendering it unresponsive to any clicks or taps on the screen. Finally! After all these processes were completed, users could finally navigate through their newly visible page.
In summary, several steps must occur for even a simple webpage to appear in your browser window:
1. DNS Lookup: Identifying the IP address of the requested web address.
2. TCP Handshake: Establishing TCP/IP communication between client and server for future exchanges.
3. TLS Handshake: Encrypting information sent between parties for security.
4. HTTP Communication: Setting up a method of communication that browsers can interpret.
5. Browser Parsing: Analyzing HTTP responses to prepare documents meant for display.
6. Browser Rendering: Displaying those documents within your browser window.
7. JavaScript Occupation: Waiting on JavaScript compilation and execution while potentially monopolising resources on the main thread.
It’s astonishing how many intricate processes unfold behind what appears to be a simple task!
How Maxthon Renders Data
1. Initiate a Request: When you enter a URL in the Maxthon browser’s address bar and hit enter, the journey begins. The browser translates the URL into an IP address using the Domain Name System (DNS).
2. Establish Connection: Maxthon then establishes a connection with the website’s server. This involves sending an HTTP or HTTPS request to retrieve the data.

3. Data Transmission: Once connected, data packets are transmitted over the internet. Maxthon utilises advanced protocols to ensure this process is efficient and secure.
4. Response Reception: After requesting information, Maxthon waits for a response from the server. This response typically includes HTML, CSS, JavaScript files, and images needed to render the webpage.
5. Parsing Content: Upon receiving the data, Maxthon’s rendering engine starts parsing the HTML content. It builds a Document Object Model (DOM) structure that represents all page elements.
6. Rendering Process: Next, CSS is applied to style these elements as defined by the web developer. At the same time, JavaScript executes any client-side scripts that may modify how content appears or functions.
7. Display Output: Finally, Maxthon draws everything on your screen in real time, creating an interactive experience tailored to your actions and inputs.
8. Caching Assets: To improve future loading times, Maxthon caches specific resources locally after receiving them for quick retrieval upon subsequent visits.
9. Handling Requests Continuously: As you navigate through links or interact with dynamic elements on a page, additional requests are made seamlessly in the background to ensure a smooth user experience without interrupting ongoing tasks.