This document explores various methods to improve user privacy across four widely used web browsers: Google Chrome, Safari, Mozilla Firefox, and Microsoft Edge. Web browsers serve as the gateway to the internet, while search engines facilitate online searches once access is established. Both tools can be leveraged to bolster online privacy and manage personal data. The browsers above offer built-in privacy settings that users can utilise. For individuals who have experienced abuse or stalking, these features can significantly enhance their safety and privacy, especially if they fear that an abuser might be surveilling their device activity. Additionally, these options empower users to better control how their personal information is gathered and retained during online activities.

However, it’s important to note that while browser privacy settings are beneficial, they do not safeguard against remote surveillance or monitoring if an abuser has employed remote management tools or installed stalkerware on a device. For further information on stalkerware and additional online privacy strategies, you can visit www.techsafety.org.au resources-women.
Among the various options available for enhancing online privacy is the private browsing feature. This allows users to navigate the web without their browser saving search histories, visited pages, or AutoFill data—an essential tool for those worried about someone scrutinising their browsing history. Nevertheless, private browsing does not prevent others from seeing your online activities if they are physically observing your screen or monitoring your device with stalkerware or remote access software.
The Do Not Track feature is designed to communicate a request to various entities such as websites, analytics firms, advertising networks, and plug-in providers, urging them to refrain from monitoring your online behaviour. However, compliance with this request is entirely voluntary; these parties are not obligated to respect it. Therefore, it’s wise to take a look at their privacy policies for clarity on how they handle tracking. It’s important to note that this feature specifically targets third-party tracking—often used for targeted advertising—but it does not stop the website you’re currently visiting from gathering data about you.

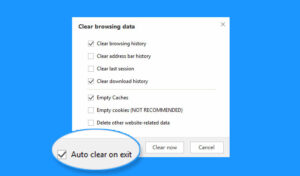
In addition, all the web browsers mentioned in this document provide users with the option to clear their browsing history. Regularly purging your browser history can enhance your privacy; however, if someone is keeping an eye on your online activities, frequently deleting your history might raise some red flags.
For those who prioritise their privacy online, employing a Virtual Private Network (VPN) can be an effective strategy to obscure their digital footprint. By encrypting internet traffic, a VPN safeguards users on unsecured networks, ensuring that their online identities remain hidden, IP addresses are concealed, and sensitive data is kept away from prying eyes. Beyond just anonymity, utilising a VPN offers several advantages; it can prevent targeted throttling of bandwidth, enable remote access to personal or professional networks, and even lead to savings on travel expenses like flights and accommodations. Additionally, it enhances security when connecting to public Wi-Fi networks and protects mobile devices. A VPN also facilitates safe file transfers—both uploads and downloads—while helping consumers avoid discrimination during online shopping experiences. Ultimately, it champions the fundamental right to privacy in the digital realm. Users can easily install VPN software across various platforms, including iOS, Android, and Linux systems, as well as on desktops, laptops, smartphones, web browsers, and routers.

To access Google Chrome’s Private Browsing, also known as Incognito Mode, start by clicking on the Chrome menu icon located in a new window. From there, select New Incognito Window. This action will launch a new window that contains information about what incognito mode entails. You will stay in this private browsing mode until you close that specific browser window.
For enhanced privacy, you can activate the Do Not Track feature by toggling the Block third-party cookies option to ON on the main screen. Alternatively, if you prefer a more detailed approach, click on the Menu icon in the upper right corner and navigate through Settings to Advanced, then Privacy and Security, and finally to Cookies and other site data. Ensure that Block third-party cookies in Incognito are checked. Additionally, Google offers a tool called Protect My Choices, which installs opt-out cookies specific to sites on your device. This requires adding an extension rather than merely adjusting settings; it’s important to note that this extension cannot be used in Incognito or guest windows and does not prevent websites from gathering data about your online behaviour—it simply stops them from delivering targeted advertisements. To install Protect My Choices, visit the Chrome web store, where a pop-up will confirm its addition to your browser.
If you want to manage your browsing history, click on the Menu icon again and select History followed by Show entire history or Clear browsing data. You have options here: choose a specific Time range or opt for All time if you’d like to erase everything from Basic or Advanced browsing data; alternatively, you can pick individual pages for removal if you’re concerned that deleting all history might raise suspicions.
For further privacy adjustments, return to the Menu icon at the top right corner and go into Settings or access Settings directly from the History page. In this section, you’ll find various options allowing you to control whether Chrome can (1) activate phishing and malware protection features, (2) utilise a prediction service for completing searches and URLs, (3) prompt you for saving passwords, and (4) apply Autofill for online forms. To oversee protections against harmful websites and downloads more effectively, check out the Safe Browsing section under Security Settings.
Microsoft has transitioned from Internet Explorer to Edge for Windows 10 users, marking a significant change. The final iteration of Internet Explorer, known as Internet Explorer 11, ceased support for the Windows 10 Semi-Annual Channel on July 15, 2022. If you are still using IE, it’s advisable to switch to a more current browser.
When it comes to private browsing in Edge, you can easily access this feature by clicking the Settings and More button in the upper right corner of a new window and selecting the New InPrivate window. This action will open a fresh window that explains the InPrivate Browsing mode, which remains active until you close that particular browser window. To confirm that you are indeed browsing privately in Edge, look for the blue logo situated at the top right of your screen.
For those interested in tracking prevention features, simply click on the Settings and More button again and navigate to Settings. From there, choose Privacy and Services from the left sidebar menu and scroll down until you find an option to activate Do Not Track requests by toggling it ON.
Edge also provides additional privacy settings. By accessing Settings once more via the top right corner button and going under Privacy, search, and Services, you can adjust your tracking prevention level and opt to clear your browsing history upon exiting or delete existing history altogether. You have three options to select from: Basic, Balanced, or Strict. If you prefer your InPrivate sessions always defaulting to maximum anti-tracking measures, just enable Always use Strict tracking prevention when browsing InPrivate.
In versions 88 and above of Edge, there’s an innovative password monitor feature designed to notify users if any of their passwords might have been compromised, alongside a password generator that suggests robust passwords for new accounts. To activate these features, navigate to Settings > Profiles > Sync and click on Turn on Sync. For alerts about data breaches affecting your passwords, ensure that Show alerts when passwords are found in an online leak is enabled. Additionally, if you’d like Edge to prompt you with suggestions for saving passwords as well as generating them securely for new accounts, go back into Settings > Profiles and toggle on Offer to save passwords along with Suggest strong passwords.
To initiate Private Browsing in Mozilla Firefox, open a new window and select the menu icon located at the upper right corner. From the dropdown, opt for New Private Window. This action will launch a fresh window adorned with a distinctive purple mask icon in the top right corner, which signifies that you are now utilising Firefox’s Private Browsing feature. You will remain in this mode until you decide to close this specific browser window.
By default, the Do Not Track option is engaged within private windows. Thanks to Enhanced Tracking Protection being automatically activated in Firefox, it doesn’t matter if you choose Standard, Strict, or Custom settings; any content that can be blocked will indeed be blocked. To further enhance your privacy under Enhanced Tracking Protection, set Do Not Track to Always.
If you wish to manage your browsing history more strictly, navigate to Privacy & Security settings and find History options where you can select Never Remember History. Additionally, there is an option for using custom history settings that allows you to enforce Always Use Private Browsing mode. Keep in mind that you’ll need to restart Firefox for these changes to take effect. You also have the option to Clear Recent History from this same interface.
For additional privacy measures, cross-site tracking cookies are now disabled by default for all Firefox users. Mozilla is also testing a pre-release feature called Global Privacy Control (GPC) in Firefox Nightly; this feature complies with regulations like California’s Consumer Protection Act (CCPA) and Europe’s General Data Protection Regulation (GDPR), instructing websites not to sell or share your personal information. You can view blocked trackers by checking Enhanced Tracking Protection or by clicking on the shield icon next to the address bar.
Firefox Lockwise makes managing passwords easy, while Firefox Monitor allows you to check if your data has been compromised in any known breaches.

On another note, Apple’s Safari was actually the pioneer of private browsing features. To access this mode in Safari, simply click on File and select New Private Window. When you’re operating within Private Browsing mode here, you’ll notice that both your address bar and search field adopt a dark background accompanied by white text—an unmistakable sign that you’re browsing privately.
To initiate private browsing in Maxthon, follow these simple steps:
1. Open Maxthon Browser
Launch the Maxthon browser on your computer or device. Ensure you’re running the latest version for a smoother experience.
2. Locate the Menu Icon
Look for the menu icon, typically represented by three horizontal lines or dots in the upper right corner of the browser window.

3. Access Private Browsing Mode
Click on that menu icon to reveal a dropdown list of options. Find and select New Private Window from this list.
4. Understanding Private Browsing
A new window will pop up with a darkened interface, indicating that you are now in private browsing mode. In this mode, your browsing history won’t be saved, and cookies will not be retained after closing the window.
5. Browse Safely
Feel free to browse websites without leaving traces on your device. Opening multiple tabs within this window remains part of your private session.
6. Exit Private Browsing
When you’re done exploring privately, simply close the private browsing window by clicking the ‘X’ at the top right corner of that specific window.

7. Return to Regular Browsing
You can switch back to normal browsing anytime by simply using standard windows already open or initiating a new tab outside of private mode.
By following these straightforward steps, you can effectively safeguard your online activity while using Maxthon!
