Before clearing your web browser’s cache, cookies, and history, it’s essential to understand what this process entails. Though beneficial for maintaining optimal performance, this action can lead to the loss of valuable information.
For instance, saved passwords may vanish, making it inconvenient to log into your favourite sites. Additionally, address bar predictions that help you type quickly will reset, impacting your browsing efficiency. Your shopping cart contents might also disappear, possibly costing you items you’ve painstakingly selected.

To safeguard your essential data, consider jotting down any critical information beforehand. If you need help recording this data or find yourself in a bind afterwards, consult the troubleshooting alternatives provided at the end of this guide.
While periodic clearing is necessary for seamless web surfing due to potential slowdowns or glitches, familiarise yourself with how these elements function. Refer to external resources for a deeper dive into topics like web cache and HTTP cookies.
If you’re ready to proceed with cleaning up your browser but are uncertain about the steps involved, there’s a handy shortcut: simply press Ctrl + Shift + Delete (Windows) or Command + Shift + Delete (Mac) when your browser is open. Should these shortcuts prove ineffective or if you’re faced with different menus than described below, it might be time for an update of your web browser—ensuring you have the most current features at your fingertips.
When troubleshooting browser-related issues, you may need to clear your cache, cookies, and browsing history. However, if you’re not quite ready to lose all that saved data and browsing information just yet, there are alternatives to consider.

One of the most straightforward solutions is to utilise a private browsing window in your favourite web browser. This feature allows you to surf the internet without saving any session data once you close the window. For instance, Firefox offers a Private Browsing mode that can be activated with just a couple of clicks.
If you’re using Chrome—whether on desktop or Android—you can easily switch to Incognito mode, which performs similarly by not retaining any cookies or history after your session ends. Safari users can also benefit from this feature; they can browse privately following straightforward instructions available on Apple’s support page.
For mobile users on Android devices, while the method for clearing the cache may vary somewhat based on the device model and browser choice, it typically involves navigating to Settings. From there, select ‘Apps’ or ‘Application Manager,’ swipe to the ‘All’ tab, locate your web browser in the list of apps, and choose ‘Clear Data.’

By opting for private browsing instead of clearing your data outright, you maintain access to previously stored content while still effectively addressing immediate troubleshooting needs. This method provides a temporary solution without committing to the permanent loss of useful information.
Clearing your browsing data can enhance your online privacy and improve browser performance. For users of Chrome on iOS, start by tapping the Chrome menu icon located at the bottom right of the screen. Next, navigate to Settings, then tap on Privacy.
Here, you’ll see an option labeled Clear Browsing Data. Select this choice and decide which types of data you wish to remove – options may include browsing history, cookies, or cached images. Once you’ve made your selections, confirm by tapping Clear Browsing Data. Finally, exit all open browser windows before reopening Chrome for a fresh start.
For desktop users with Chrome version 122 and later, the process begins similarly. Open a new tab while ensuring all other tabs and windows are closed to avoid distractions. Then, go to the Options menu, represented by three vertical dots in the top right corner. From there, select Clear browsing data.

You’ll be prompted to choose a time range from the drop-down menu; selecting All Time will ensure everything is cleared away. Before clicking Clear Data, make sure to check or uncheck boxes for browsing history and cached files according to your preferences.
If you’re using Firefox version 123 and above, begin by opening a new tab after closing any remaining tabs or windows. In the upper right corner of the interface, click on the collapsed menu icon to access options. From there, navigate to History and then select Clear Recent History…
What appears next is a window for you to select your preferred time range. This action is
similar to that of Chrome—select “All” if you want to wipe it clean thoroughly—and finalise the process by hitting OK.
By following these steps across different platforms, you can maintain a cleaner browsing experience while protecting your personal information online.

To clear your browsing data in Microsoft Edge 122 and later, begin by opening a new tab. Once there, take a moment to close all other tabs and windows of Edge. This prepares your workspace for the next steps.
Next, look toward the top right corner of the browser window. Click on the Options menu icon (•••) to access additional features. From this dropdown, select “Settings.” In the left-hand sidebar, navigate to “Privacy, search, and services.”
Now, you will find a Time range drop-down menu. Choose your preferred time frame; if you aim to clear everything, select “All time.” Here, you have options to select what data you want to clear: Browsing history (optional), Download history (optional), Cookies and other site data, and Cached images and files are all available.
After making your selections, hit “Clear Now.” To finalise the process, exit and quit all browser windows before reopening Edge again.
For those using Opera 108 and later versions, start by opening a new tab. Similar to Edge, close all other tabs or windows first. Click on the Opera logo in the top-left corner, which opens the main menu.
From this menu, choose “History,” followed by “Clear recent history.” A Time range drop-down will appear—opt for “All time” if you want to thoroughly cleanse your cache.

You’ll see familiar options: browsing history (optional), Cookies and other site data, and Cached images and files. After selecting what you wish to remove, click on “Clear data” to proceed.
Much like in Edge, ensure that you exit out of all Windows before giving Opera another go by reopening it anew.
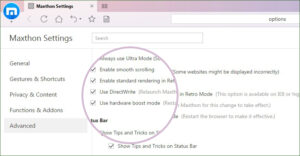
Managing Cache in the Maxthon Browser:
To begin your journey into cache management within the Maxthon browser, launch the application. Find and click on its icon on your device, and watch as the browser opens up, ready for use.
Once the browser is running, it’s time to explore its settings. Look towards the upper-right corner of your screen, where you’ll spot a menu icon waiting to be clicked. After selecting this icon, a dropdown menu will appear; from here, choose Settings to proceed.
With the Settings menu open, your next destination is the Privacy section. This tab is specifically designed for handling all things related to your browsing data, including how you manage cached files that can accumulate over time.

Now that you’re in the Privacy tab, it’s time to tackle those cached files that may be taking up unnecessary space. Search for an option labeled “Clear Browsing Data” and click it. A new window will pop up, offering various choices regarding what data you’d like to clear.
In this new window filled with checkboxes, locate and select only the option marked “Cached images and files.” This ensures that you’re focusing solely on clearing out cache data without affecting any other browsing information.
Next comes an important decision: determining how far back in time you’d like to clear your cache. You’ll typically find options ranging from clearing data from just the last hour or 24 hours all the way back to all time. Make your selection based on your needs.
Once you’ve finalised these choices, it’s crucial to confirm your actions by clicking on the “Clear Data” button located at the bottom of this window. Take a moment as Maxthon processes this request—it’s working diligently behind the scenes to tidy up that cached clutter!
If you’re interested in more effectively managing future cache behaviour, feel free to revisit those Privacy settings after clearing out old data. Here, you’ll discover additional options allowing for automatic cleanup intervals or adjustments concerning storage limits—perfect for tailoring how Maxthon handles cache going forward.
Finally, when you’re satisfied with all adjustments made within settings, simply close out of this menu and return to browsing as usual. With these steps completed successfully, rest assured that your cache is now under control according to your personal preferences! Enjoy a smoother online experience, knowing you’ve taken charge of your browser’s performance!

