Your PC’s ability to detect your actual location is beneficial. It ensures that your clock updates automatically when you travel to a different time zone. Plus, it helps Google serve up the best local restaurants and services when you’re searching online.
However, there are times when you might want to change that location. Altering your device’s location can help you bypass geo-restrictions in apps and various online services.
We’ve experienced this firsthand while navigating our Windows 10 systems, and today, we’re excited to share the exact methods we use to change our computer’s location whenever needed.
The great news is that these techniques work seamlessly on any version of Windows! Whether you’re using Windows 10 or have upgraded to Windows 11, our foolproof tricks will enable you to customise your location with ease.
Unlock a world of possibilities by changing your PC’s location with a VPN!
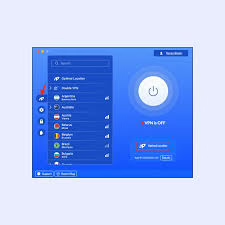
A reliable Windows VPN is your best ally for this task. It allows you to mask your actual IP address and adopt the IP address of the server you connect to.
When you engage a VPN, it creates a secure tunnel between your device and the internet. This feature not only enhances your online Privacy but also tricks websites and applications into believing you’re located in another country.
Imagine having access to a vast library of content on platforms like Netflix! By simply switching your virtual location, you can enjoy movies and shows that may be restricted in your area.
Whether it’s streaming, gaming, or browsing, using a quality VPN ensures that you get the most out of your online experience. Don’t miss out—explore different regions today! Choose one of our recommended VPNs to elevate your digital adventures now!
Guide to Changing Location on a PC
Using a VPN can help mask your PC’s location, but it doesn’t guarantee that all apps will reflect this change. Many applications still rely on GPS data if you have Location Settings enabled.
You may need to adjust these settings manually to ensure your apps recognise the new location. Below are detailed instructions for changing your device’s Location Settings.
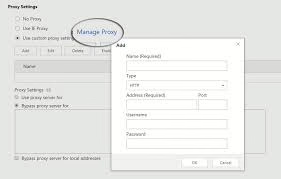
Now, let’s discuss VPN options. You can install a VPN directly on your PC or use a browser extension, such as one designed for Chrome. Additionally, setting up a VPN at the router level is possible but typically more complex.
For those opting to set up a VPN on their PC, follow these steps:
- Choose a reputable VPN service and sign up for an appropriate subscription plan.
- Download the VPN application or relevant browser extension.
- Log in using your provided credentials.
- Connect to a server located in your desired area.
Following these steps will help you successfully hide your actual IP address and appear as though you’re browsing from another location.
How to Enable Location Settings After Using a VPN
When you change your PC’s location with a VPN, it’s essential to enable the relevant location settings. This ensures that apps can retrieve new location data based on the VPN server you’re connected to.
Enabling Location Settings in Microsoft Edge
- Open the Start Menu: Click on the Windows icon at the bottom left of your screen.
- Access Settings: Select Settings from the menu.
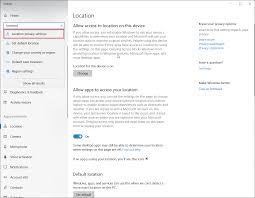
- Navigate to Privacy: In the Settings window, click on Privacy.
- Select Location: On the left sidebar, find and choose Location.
- Turn on Access: Enable “Allow Access to Location on This Device.” Also, turn on “Allow Apps To Access Your Location” and “Allow Desktop Apps To Access Your Location.”
After completing these steps, Microsoft Edge will utilise your updated location for web browsing.
Setting Up Cortana

To enable location access for Cortana:
- Go back to the Privacy section in Settings.
- Find and select “Speech, inking & typing” from the privacy options.
- Ensure that all permissions necessary for Cortana are active.
Note: If an organisation manages your device or if it’s set up for work purposes, you may have restrictions preventing changes to these settings.
Cortana is Microsoft’s voice assistant, and it can enhance your productivity, much like Amazon’s Alexa and Google Assistant. If you enable Cortana, it will periodically collect your location data. This information is sent to Bing to provide you with personalised web search results tailored to your area.
To activate Location Settings for Cortana, follow these steps:
- Open the Start Menu on your Windows device.
- Click on Settings, represented by a gear icon.
- In the Settings menu, select Cortana to access its options.
- Click either Permissions or Permissions & History, depending on your version of Windows.
- Choose Manage the Information Cortana Can Access From This Device.
- Finally, toggle the switch to turn Location Settings on.
Once enabled, Cortana will be better equipped to assist you with relevant local information and services!
How Do Location Settings Work in Windows 10?
Location settings on Windows 10 PCs offer flexibility but require careful management compared to Mac computers. Specific applications and features, such as Find My Device, navigation apps, and automatic time zone adjustments, depend on accurate location data.
So, how does Microsoft collect this information? They utilise various methods, including GPS signals, nearby wireless access points, IP addresses, cellular tower data, and the MAC addresses of devices, wireless routers, and other Internet of Things (IoT) gadgets connected to Wi-Fi.
Once your computer gathers this location data, it anonymizes the information by removing any personally identifiable information (PII). This process enhances your Privacy and reduces the risk of identity theft in case of a data breach.
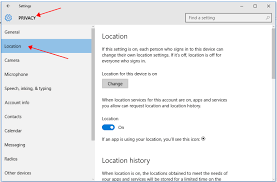
To customise your location settings according to your preferences:
- Go to Settings.
- Click on Privacy.
- Select Location from the sidebar.
From there, you can restrict or allow location access for specific apps and adjust broader location preferences as needed.
Managing Location History
In today’s digital world, understanding your Location History is essential. Some applications collect not only your current location but also a log of where you’ve been in the past. Microsoft archives this data for a limited period before automatically deleting it to help protect your Privacy.
To review which apps are accessing your Location History, navigate to your Location Settings. There, you will find a list detailing the specific applications that utilise this feature.
Setting Default Location
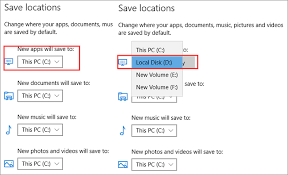
If an app cannot determine your precise location, it will default to a pre-set location instead. You can easily configure this Default Location in your Location Settings by entering the address or choosing it on the map.
Understanding Geofencing
Geofencing is a technology that allows applications to turn functionality on or off based on predefined geographical boundaries. For geofencing to work correctly, ensure that location services are enabled for those apps. You can view which apps employ geofencing through the same Location Settings menu.
Monitoring Your Location Icon
When one or more applications access your PC’s location—aside from geofencing—you’ll notice a Location icon appearing in the notification area of your taskbar. This is an indication that location services are currently being utilised. To customise when this icon appears and disappears, refer to settings regarding its visibility in your system preferences.
How to Check Location Settings on Your PC
To verify if location services are enabled on your Windows PC, follow these steps:
- Open the Start Menu by clicking the Windows icon in the bottom-left corner of your screen.
- Select Settings, which is represented by a gear icon.
- Click on Privacy from the Settings menu.
- Navigate to Location in the left sidebar.
Remember to check your location settings following any Windows update, as updates can sometimes revert your preferences to default settings and re-enable location tracking.
How to Clear Location History
If you prefer not to have others track your movements through your device, you can clear your location history by doing the following:
- Access the Start Menu and select Settings once again.
- Click on Privacy, then go to Location.
- Under the Location History section, click on Clear.
Keep in mind that clearing your Location History only removes data stored on your Windows 10 device. Some applications may still retain their logs of your location usage. To understand what data is collected, review each app’s privacy policy or check directly with significant tech companies regarding their logging practices.
How to Turn Location Settings On and Off on Your PC
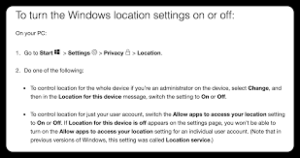
To adjust the Location Settings for your entire PC, follow these steps:
- Open the Start Menu: Click the Windows icon located at the bottom left corner of your screen.
- Access Settings: In the Start Menu, click on “Settings,” which looks like a gear icon.
- Select Privacy: Within Settings, find and click on “Privacy” to access various privacy-related options.
- Navigate to Location: In the left sidebar, select “Location” to manage your location settings.
- Change Device Location Setting: Click on Change under “Location for this device.” Here, you’ll see a switch that allows you to turn location services on or off for your entire PC.
- Toggle as Needed: Slide the toggle switch to the right to turn location services on or slide it to the left to turn them off.
To manage location settings specific to your user account:
- Return to Location Settings: Follow steps 1-4 above again.
- Adjust App Access: Look for an option labelled “Allow apps to access your location.” Toggle this setting on or off according to your preferences.
Keep in mind that individual app access can only be adjusted if system-wide location services are enabled first. Always check that global settings align with your intended privacy controls!
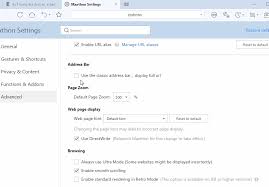
Steps to Change Your PC Location on Maxthon Browser
If you want to change your PC’s location while using the Maxthon browser, follow these simple steps.
- Open the Maxthon Browser: Start by launching the Maxthon browser on your computer. Ensure that your internet connection is stable for optimal performance.
- Access the Menu: Look for the menu icon located in the top-right corner of the window. Click on it to reveal a drop-down menu.
- Go to Settings: From the drop-down menu, select the Settings option. This will redirect you to a settings page where you can adjust various preferences.
- Navigate to Privacy and Security: On this settings page, find the section labelled Privacy and Security. Here, you will encounter features related to location services.
- Manage Geolocation Settings: Search for an option to modify geolocation settings or similar permissions. The exact wording may vary depending on your version of Maxthon.
- Enter New Location: To change your location, either input a new address manually or select from available options, such as different cities or regions.
- Save Changes: Remember to save any adjustments you’ve made before exiting the settings page.
- Refresh Your Browser: Finally, refresh your browser for the changes to take effect and ensure that your new location is appropriately registered.
")