In the realm of web development, users have a clear expectation: they desire web experiences that are not only quick to load but also provide seamless interaction. To meet these demands, developers should focus on two primary objectives. A solid understanding of browser functionality is crucial for enhancing both actual and perceived performance.
To put it simply, faster websites lead to more satisfying user experiences. Users naturally anticipate web content that loads swiftly and allows for smooth engagement. Two critical factors affecting web performance are latency issues and the inherent single-threaded nature of most browsers. Latency poses a significant challenge in our quest for rapid page loading; thus, developers aim to optimise site loading times—ideally making them feel instantaneous—so users can access information without delay.
Network latency refers to the time required for data transmission over networks, impacting how quickly content appears on screens. Improving web performance involves strategies aimed at accelerating page load times as much as possible. Since browsers typically operate in a single-threaded manner—processing one task completely before moving on to another—developers need to prioritise efficient interactions within their sites.
To ensure smooth user experiences, from effortless scrolling to responsive touch actions, render time becomes paramount. Developers must guarantee that the main thread can handle all assigned tasks while remaining available for user interactions at all times. By acknowledging the limitations posed by the single-threaded architecture of browsers and strategically reducing the workload on the main thread when feasible, developers can achieve smoother rendering and prompt responses.
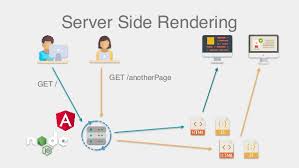
Navigation marks the initial phase of a webpage’s loading process, triggered whenever a user enters a URL into their browser’s address bar, clicks on links, submits forms, or engages in various other activities. One key objective in optimising web performance is to reduce navigation time as much as possible.
DNS lookup
When you want to visit a website, the very first thing that happens is locating where the necessary files for that page are stored. For instance, if you type in https://example.com, the HTML content resides on a server identified by the IP address 93.184.216.34. If this is your first time visiting that site, your browser initiates a DNS lookup. This request travels to a name server, which then provides the corresponding IP address in return. Once this process is completed for the first time, your device will likely save that IP address temporarily in its cache, allowing for faster access on future visits since it won’t need to reach out to the name server again.
Typically, each unique hostname associated with various elements of a webpage—like fonts, images, scripts, advertisements, and analytics—requires its own DNS lookup. So, if these elements come from different domains, your browser will have to perform multiple lookups.
For mobile users, there’s an additional layer of complexity: requests must first travel from their device to a cell tower and then onward to a central server before reaching the Internet itself. This extra journey can slow down performance significantly on mobile networks because each DNS query has to traverse this path—from phone to tower and finally to the authoritative DNS server—adding latency due to distance.
TCP handshake
Once your browser has obtained the necessary IP address through these lookups, it proceeds with establishing a connection using what’s known as a TCP three-way handshake. This process enables both parties involved—the browser and web server—to agree on how they will communicate over their TCP socket connection before any data transfer begins; often, this occurs over HTTPS for added security.
The handshake involves three distinct messages exchanged between them: SYN (synchronise), SYN-ACK (synchronize-acknowledge), and ACK (acknowledge). Essentially, this means three additional messages must be sent back and forth before any actual request can be made or data transmitted at all!
TLS negotiation
When establishing secure connections through HTTPS, an additional step known as TLS negotiation comes into play, akin to a handshake. This process is crucial as it selects the encryption cypher for the communication, confirms the identity of the server, and ensures that a secure link is firmly established before any data transfer begins. However, this means that before the actual content request can be sent, there are five additional round trips needed to communicate with the server. These steps include a DNS lookup, a TCP handshake, and five distinct phases of the TLS handshake: client hello, server hello, along with certificate exchange, followed by client key exchange and finalisation from both parties.

While this emphasis on security does introduce some delays in page loading times, the benefits far outweigh these costs. The encrypted connection guarantees that no unauthorised third party can intercept or decipher any information exchanged between the browser and web server. After completing these eight rounds of communication with the server, the browser is finally ready to send its request.
Once this secure connection has been established with a web server, it’s time for action: the browser dispatches an initial HTTP GET request on behalf of its user, typically seeking an HTML file for websites. Upon receiving this request, the server responds promptly with pertinent headers along with the requested HTML content.
When a user initiates a connection with a web server, their browser promptly sends an initial HTTP GET request, typically for an HTML file on the website. Upon receiving this request, the server responds with the appropriate headers and delivers the HTML content.
Here’s an example of such an HTML document:
“`HTML
<!doctype html>
<html lang=en-US>
<head>
<meta charset=UTF-8>
<title>My Simple Page Title</title>
<link rel=stylesheet href=styles.css>
<script src=myscript.js></script>
</head>
<body>
<h1 class=heading>My Page</h1>
<p>A paragraph with a <a href=https://example.com/about>link</a>.</p>
<div>
<img src=myimage.jpg alt=image description>
</div>
<script src=anotherscript.js></script>
</body>
</html>
“`
The response generated for this initial request includes the very first byte of data that is sent back. The metric known as Time to First Byte (TTFB) measures the duration from when the user clicks a link to when they receive this initial packet of HTML. Typically, this first piece of data is around 14KB in size. In our case, while the request itself may be smaller than 14KB, additional resources linked within won’t be requested until the browser encounters them during its parsing process.
Now, let’s talk about congestion control and TCP slow start. When TCP packets are transmitted, they are divided into segments. Since TCP ensures that packets arrive in order after sending a set number of segments, the server awaits confirmation from the client through an ACK packet. If it were to wait for an acknowledgement after each segment is sent, it would lead to numerous frequent ACKs from the client and prolonged transmission times—even on networks with low traffic.
Conversely, if too many segments are dispatched at once in a busy network scenario, it could overwhelm the client’s ability to receive them properly. This would result in delayed acknowledgements as the client keeps responding with ACKs over time while waiting for missing segments to arrive—forcing the server into repeated retransmissions.
Thus, finding a balance between these two extremes is crucial for efficient data transmission across networks.
Constructing the DOM Tree
In the intricate process of rendering a webpage, five essential steps unfold along the critical rendering path. The journey begins with the interpretation of HTML markup, leading to the formation of the DOM tree. This phase, known as HTML parsing, encompasses two key activities: tokenisation and tree construction. During this process, various HTML tokens—such as opening and closing tags along with their associated attributes—are identified. When the document is well-structured, this parsing becomes a seamless and efficient task.
 As the parses processes these tokens, it gradually assembles what is known as the document tree—the DOM tree—which encapsulates all content within the document. At its foundation lies the HTML element, serving as both the first element and root node of this hierarchical structure. The tree visually represents how different elements relate to one another; elements contained within others are categorised as child nodes. It’s worth noting that an increase in DOM nodes can extend the construction time for this tree.
For instance, consider our sample code that illustrates all nodes present within a DOM tree—including text nodes. As parsing unfolds and non-blocking resources like images are detected by the parser, browsers promptly request these assets while continuing their work on parsing HTML. When encountering CSS files during this process, parsing can proceed; however, script elements without async or defer attributes act as roadblocks—they halt rendering and temporarily pause HTML parsing.
To mitigate delays caused by excessive scripts—which can become significant bottlenecks—the browser employs a preload scanner to enhance efficiency while building the DOM tree on its main thread. This preload scanner diligently scours available content in search of high-priority resources such as CSS stylesheets, JavaScript files, and web fonts. Thanks to its proactive approach, we no longer have to wait for explicit references to external resources before initiating requests; instead, it retrieves them in advance so that when our main HTML parser eventually reaches these assets, they may already be on their way or fully downloaded.
This optimisation significantly minimises interruptions during rendering—a crucial advantage in ensuring a smoother user experience.
As the browser processes a webpage, it engages in several vital activities simultaneously. While the CSS is being analysed and the CSS Object Model (CSSOM) is formed, other resources like JavaScript files are also being downloaded thanks to a feature known as the preload scanner. JavaScript undergoes a series of steps, including parsing, compilation, and interpretation. During this phase, scripts are transformed into abstract syntax trees (ASTs). Some browser engines take these ASTs further by sending them to a compiler that generates bytecode, a process referred to as JavaScript compilation. Although most of this code runs on the main thread, there are notable exceptions, such as scripts executed within web workers.
In parallel to these operations, the browser constructs an accessibility tree designed for assistive technologies that help users navigate and understand content. This accessibility object model (AOM) serves as a semantic counterpart to the Document Object Model (DOM). The accessibility tree is updated whenever changes occur in the DOM; however, it cannot be altered directly by assistive technologies themselves. Until this AOM is fully established, screen readers cannot access or interpret any content.
The rendering process consists of several stages: styling, layout calculation, painting elements onto the screen, and sometimes compositing layers for better performance. The render tree emerges from combining both CSSOM and DOM trees created during parsing. This render tree serves as a blueprint for determining how each visible element will be laid out before they are rendered visually on-screen. In certain instances, specific content can be allocated to its layer, which allows it to be processed using the GPU rather than relying solely on the CPU. This shift helps optimise performance by freeing up resources on the main thread.
The third crucial step in this critical rendering path involves merging both DOM and CSSOM into what’s known as a render tree. This construction begins at the root of the DOM tree and systematically examines each visible node within it. Elements that won’t appear in the final output—such as those found within the head section or any nodes designated with display: none—are excluded from this render tree since they do not contribute to what users ultimately see on their screens. On the other hand, nodes marked with visibility: hidden are still included in this structure despite being invisible in appearance.
Compositing
When a document is layered with different sections overlapping one another, compositing becomes essential to ensure that everything is displayed on the screen in the correct sequence and that the content appears as intended. As the page loads various assets, it can lead to reflows—like when an image arrives later than expected. A reflow triggers a repaint and necessitates a recomposite. If we had specified the dimensions of our image from the start, we could have avoided any reflow; only the specific layer requiring repainting would have been affected, and compositing would occur only if needed. Unfortunately, we overlooked defining those dimensions! When the image finally downloads from the server, it sends the rendering process back to square one with layout adjustments.

Interactivity
Once painting is complete on the main thread, you might assume everything is ready to go. However, that’s only sometimes true. If there’s JavaScript included that was deferred correctly until after the onload event has fired, this can keep the main thread busy and unavailable for actions like scrolling or responding to touch inputs. The Time to Interactive (TTI) measures how long it takes from that initial request—beginning with DNS lookup and TCP connection—to when users can actually interact with the page effectively; this interaction should occur within 50 milliseconds after the First Contentful Paint. If JavaScript is monopolising resources by parsing, compiling, or executing code on the main thread, it won’t be able to react swiftly enough for user interactions.
For instance, while an image might load promptly, consider if another script file—let’s say it’s 2MB—takes longer due to a slow network connection for our user. In such cases, they may see content appear quickly but struggle with scrolling smoothly until that script has been fully downloaded and executed. This scenario leads to a frustrating experience for users! It’s crucial to avoid tying up the main thread unnecessarily; lessons learned can be gleaned from examples like WebPageTest.
How Maxthon Browser Turns Code Into Websites Quickly
- Start with the Code: Write your HTML, CSS, and JavaScript code using a text editor of your choice. This could be a simple notepad or a more advanced IDE.
- Launch Maxthon: Open the Maxthon browser on your device. Known for its speed and efficiency, it’s designed to handle web development tasks seamlessly.
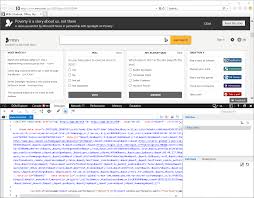
- Use Developer Tools: Access the developer tools in Maxthon by pressing F12 or right-clicking on any webpage and selecting ‘Inspect.’ This feature allows you to view and edit the website’s code in real-time.

- Preview Your Work: Save your code as an HTML file on your computer, then simply drag and drop this file into the Maxthon browser window. You’ll instantly see a live preview of how your website looks.
- Instant Refresh: If you make changes to your code, refresh the Maxthon browser to update the displayed page instantly. This rapid feedback loop allows for swift iterations during development.
- Utilize Cloud Sync Features: Maxthon offers cloud syncing capabilities that let you save your projects online. This ensures that you’re always working with the most updated version of your files across devices.
- Optimize for Speed: Experiment with various settings in Maxthon to enhance performance further, such as enabling turbo mode for faster loading times or utilising their built-in ad blocker to minimise distractions.
- Test Across Platforms: Use Maxthon’s multi-platform functionality to test how your website renders across different devices, ensuring responsiveness and user-friendliness everywhere.
- Final Review & Launch: Once you’re satisfied with your project, consider launching it through a hosting service, knowing that you’ve efficiently crafted it using Maxthon’s powerful tools.
By following these steps, you’ll find that creating websites using Maxthon can be both quick and effective!